How to Start a Vertical Farm? Step-by-Step Setup at Home
How to start a vertical farm at home or as a business: shelves, LED lights, nutrient solution and pH. Materials list, step-by-step setup, maintenance plan and common mistakes.
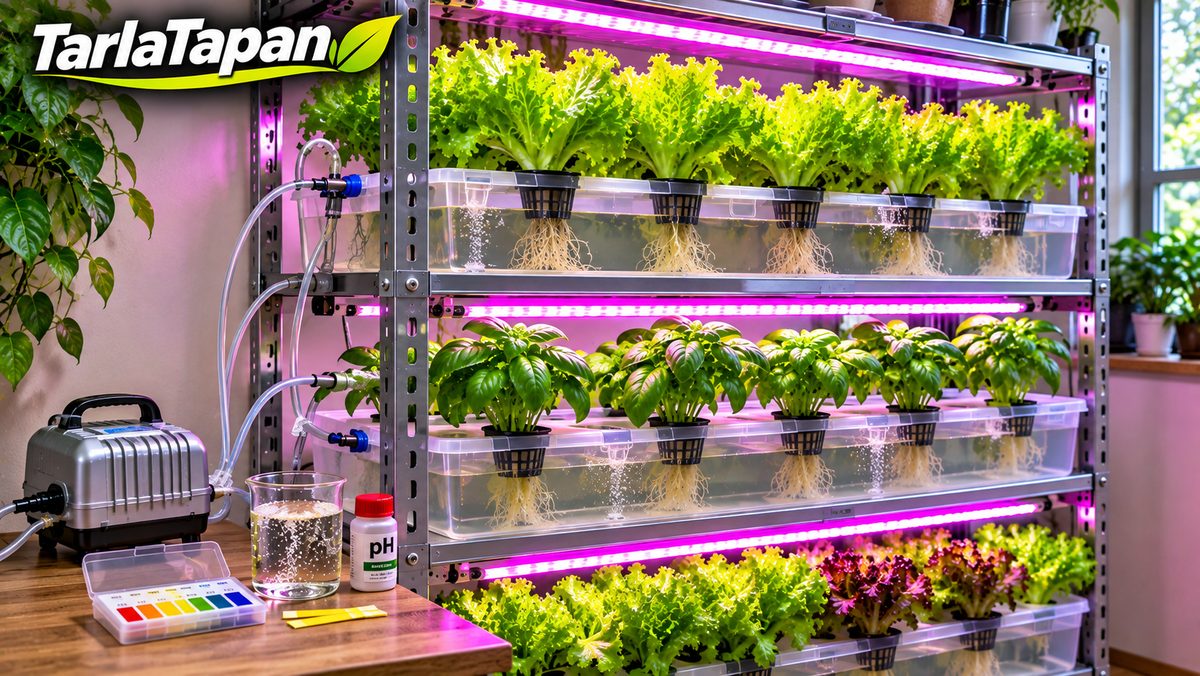
How to start a vertical farm comes down to five parts: stacked shelves, a soilless growing container, a nutrient solution, light and a clean environment. Put those five together and you can grow layers of greens on a balcony or in a warehouse. University of Minnesota Extension lists what any hydroponic setup needs: plants, a container, water, a way to anchor the plants, nutrients and a light source.
This guide starts with a small home vertical garden and then explains what changes when you move to a commercial scale. If you are new to the topic, read what is vertical farming first.
Contents
- What to decide before you start
- Materials list for a home vertical farm
- Step-by-step setup at home
- How to manage water, pH and fertilizer
- How to keep roots supplied with air
- How to start a commercial vertical farm
- Maintenance schedule
- Common beginner mistakes
What to decide before you start
Before you start, decide three things: what you will grow, which light you will use and how much space you have. Every piece of equipment follows from those answers.
- Crop: The easiest crops for beginners are lettuce, arugula, basil and mint. UMN Extension writes that lettuce, herbs and brassicas such as mustards and kale grow well year-round in hydroponic systems.
- Light: A very sunny south-facing window may be enough in summer. Indoors and in winter you will almost always need lamps.
- Space: A wall, a balcony or a spare room. Shelf height depends on the ceiling.
Do not start with tomatoes, peppers or cucumbers. UMN Extension explains that these can be grown indoors with extra heat and light, but the added heat and light would be cost-prohibitive for most gardeners. See what can you grow in a vertical farm for the full list.
Materials list for a home vertical farm
Everything for a home vertical farm can be found at a hardware store and a garden center. A self-built setup costs far less than a ready-made kit.
| Item | Purpose | Note |
|---|---|---|
| Adjustable wire shelf | Creates the layers | Each level must hold a lamp |
| Plastic tote or bucket with lid | Water and nutrient tank | Food-safe plastic |
| Net pots | Hold the plants | Small pots with slotted sides |
| Growing medium | Supports roots | Rockwool, clay pebbles, perlite, coconut coir |
| LED grow light | Replaces the sun | Red and blue or full spectrum |
| Air pump and airstone | Adds oxygen to water | An aquarium pump is enough |
| pH test strips | Measure acidity | Cheap and last for years |
| Hydroponic fertilizer | Plant food | Ready mix for your crop |
| Timer plug | Switches the lamp | Prevents forgetting |
UMN Extension calls deep water culture the simplest and least expensive system. Plants sit in a lid or floating board and the roots hang into the water below. A 5-gallon bucket or a plastic storage bin is enough as a container.
Step-by-step setup at home
A home vertical farm is built from a few water containers placed on a shelf, with lamps hung above each level. Follow this order:
- Set up the shelf. Place the wire shelf against a wall. Leave enough room between levels for plant height plus the lamp.
- Drill the lids. Cut holes in the lid the size of your net pots. The rim of each pot should rest on top of the lid.
- Rinse the medium. UMN Extension recommends soaking any growing medium in water for 24 hours and changing the water before use. This removes dust and residues that can affect pH.
- Start seeds separately. Sow seeds in rockwool or coconut coir starter cubes. When roots push through the bottom of the cube, the seedling is ready to transplant.
- Mix the nutrient solution. Add fertilizer to water at the rate shown on the label, then test the pH.
- Place the seedlings. Put each seedling in a net pot and set the pot in the lid. At first, the bottom of the pot should touch the solution.
- Set the light. Connect the lamp to a timer. UMN Extension's example calculation is based on a light running 14 hours a day.
- Add air. Drop the airstone into the container and switch on the pump. This matters even more if plants of different sizes share one container.
Repeat this on every level and you have a small vertical farm. Moving containers from the floor onto a shelf means two or three times more plants on the same footprint.
How to manage water, pH and fertilizer
In a soilless system the plant takes everything from water, so pH and fertilizer rates matter much more than in soil. According to UMN Extension, plants do best in water with a pH of 5.4 to 7. Outside that range, plants cannot use nutrients efficiently.
In practice:
- Test tap water. Check pH both straight from the tap and after adding fertilizer.
- If pH is too low: UMN Extension suggests adding baking soda.
- If pH is too high: The same source recommends citric, phosphoric or sulfuric acid. Use only food-grade products.
- Hard water: Water that leaves crust on faucets is usually high in bicarbonate and pushes pH up. Test such water more often.
- Fertilizer: Many elements found in soil are missing in water. UMN Extension notes that besides nitrogen, phosphorus and potassium, a hydroponic system must also supply calcium, magnesium, sulfur, iron, zinc, boron and others, and the easiest way is a fertilizer made for hydroponics.
Keep crops with different needs in separate containers. The same source explains that tomatoes and lettuce have different nutrient requirements and should not share a container.
How to keep roots supplied with air
Roots must not drown, so either part of the root mass stays in the air or a pump adds air to the water. Roots starved of oxygen are the most common cause of root rot.
In the passive method (Kratky method), the water level drops over time and the upper roots stay in the air. UMN Extension recommends keeping only one third to one half of the roots submerged once they develop. In the active method, an aquarium pump pushes tiny bubbles through an airstone. With many containers, you can connect them with tubing and feed them from one reservoir.
How to start a commercial vertical farm
Starting a commercial vertical farm means building the same system larger, automated and inside a closed building. The differences are scale, climate control and a sales plan.
- Building: An empty warehouse, barn or container. USDA ARS notes that shipping containers and abandoned warehouses are readily available and relatively inexpensive.
- System: Commercial growers usually use nutrient film technique (NFT), ebb and flow or drip systems. We explain them in types of vertical farming.
- Climate: Air conditioning keeps temperature and humidity steady. USDA ARS stresses that humidity control requires expensive and energy-intensive HVAC systems.
- Backup power: UMN Extension warns that pump-based systems lose water supply during a power outage, which is why larger growers keep generators.
- Hygiene room: Hand washing, shoe change and a rule against bringing in outside plants.
- Sales: The product is sold fresh. Sign agreements with restaurants, grocers or markets before the first harvest.
In the large farm described by BZL, plants grow on plastic boards and receive water and nutrients through a computer-controlled loop. Before investing, work through the numbers in do vertical farms make money.
Maintenance schedule
Maintenance takes five minutes a day and half an hour a week. Regular care also prevents disease.
| When | Task |
|---|---|
| Daily | Check water level, lamp, pump and leaves |
| Weekly | Top up with nutrient water, test pH |
| Long-season crops | Replace the solution completely |
| After every harvest | Wash and sanitize containers, pots and tubing |
UMN Extension notes that never changing the water is only suitable for short crops such as lettuce, which can be harvested in 6 to 7 weeks. When topping up, keep the fertilizer rate from the label. Do not pour used nutrient water down the drain; give it to a garden or houseplant.
Common beginner mistakes
Most beginners make the same few mistakes:
- Submerging roots completely: Roots rot. Keep about half of them in the air.
- Skipping pH tests: Leaves yellow and the cause stays a mystery.
- Using garden fertilizer: Trace elements are missing.
- Bringing in outside plants: Pests and diseases come too. See vertical farming pests and diseases.
- Starting with fruiting crops: Light and heat fall short and yields stay low.
Frequently Asked Questions
How do you set up a vertical farm at home?
You set up a home vertical farm by placing lidded containers of nutrient water on a wire shelf and hanging a grow light above each level. Seedlings sit in net pots in the lids with roots hanging into the water. Test the pH and use a hydroponic fertilizer.
Do you need soil for vertical farming?
You do not need soil for vertical farming; most systems are soilless. Rockwool, clay pebbles, perlite or coconut coir hold the plant in place. Nutrients come from fertilizer dissolved in the water.
How many hours of light does a vertical farm need?
Light hours depend on the crop. In UMN Extension's example for a small system, the lamp runs 14 hours a day. A timer plug keeps the schedule consistent.
How often should you change the water?
Top up the water weekly with nutrient solution. For short crops like lettuce you can often reach harvest without a full change. For long-season crops such as tomatoes, or herbs that you keep cutting, replace the solution completely once or twice per season.
What is the easiest crop for a beginner?
The easiest crops for a beginner are lettuce, arugula, basil and mint. They are short, grow fast and do not need much light. Leaf lettuce and herbs can be cut several times before replanting.
TarlaTapan guides focus on practical, field-tested growing advice. Corrections and suggestions are welcome at info@tarlatapan.tr.